
4 Essential Steps In The Dental Implant Placement Process
Getting a dental implant can feel overwhelming. You might have worries or doubts. Remember, you are not alone. It’s important to know what to expect and how to prepare. This blog helps guide you through the four steps of getting a dental implant. You get a clear idea of the process from start to finish. Visiting a dentist in Great Falls can make this journey easier for you. They understand your needs and focus on your comfort and safety. Your well-being matters to them. Knowing these steps helps you make informed choices. You’ll feel more confident and prepared from the start. The dental implant process involves careful planning, precise placement, healing, and proper care. Each step is crucial to ensure a successful outcome. By understanding these stages, you take control of your health. You take positive actions towards a healthier smile. Let’s make this journey together.
Step 1: Initial Consultation and Planning
The first step involves meeting with a dental professional. They check your oral health and determine if you are a good candidate for an implant. This visit might include X-rays or scans to assess your jawbone. It helps the dentist create a precise plan tailored for you. You discuss your medical history and any concerns you have. This step ensures safety and accuracy. Preparing well here lays a strong foundation for success.
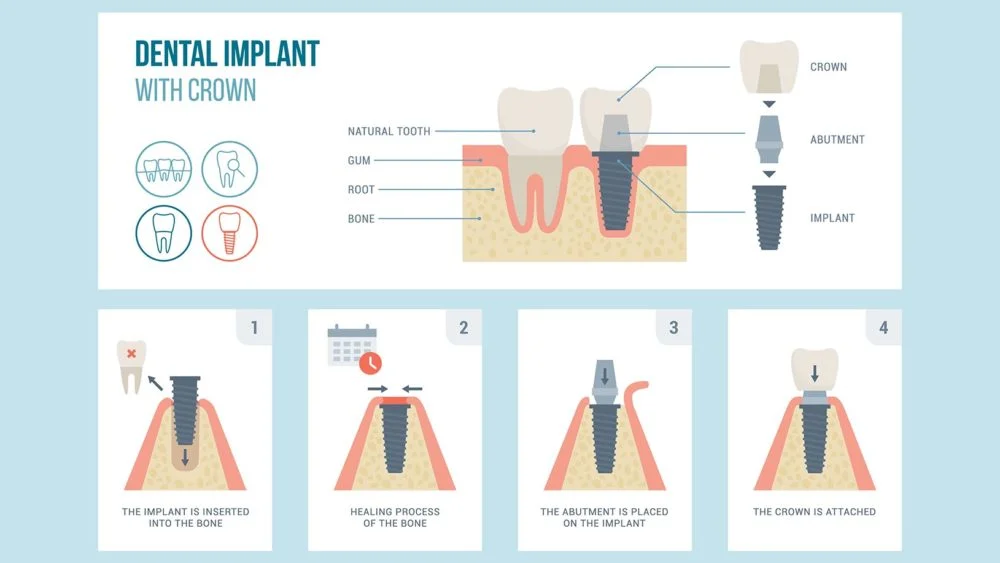
Step 2: Implant Placement
Once your plan is ready, the next step is placing the implant in your jaw. The dentist starts by numbing the area. This makes the procedure comfortable for you. Then, a small incision is made in the gum to reach the bone. The implant, which is a tiny metal post, is carefully inserted. This step requires skill and precision.
| Procedure | Duration | Purpose |
|---|---|---|
| Initial Consultation | 30-60 minutes | Assessment and planning |
| Implant Placement | 1-2 hours | Insert metal post |
| Healing Period | Several months | Bone integration |
| Abutment and Crown Placement | 1-2 hours | Final restoration |
Step 3: Healing and Osseointegration
After the implant is placed, healing begins. This period can last for several months. During this time, the implant fuses with the bone. This process is known as osseointegration. It is critical for the stability and longevity of the implant. You need to follow the dentist’s instructions closely. Proper care ensures successful integration and prepares you for the final step.
For more details on what to expect during this period, you can visit resources like the National Institute of Dental and Craniofacial Research.
Step 4: Abutment and Crown Placement
Once healing is complete, the final step is placing the abutment and crown. The abutment serves as a connector between the implant and the crown. The dentist attaches it to the implant. Then, a custom-made crown is placed on top. This crown matches your natural teeth in color and shape. It completes your smile and restores functionality.
Understanding each step helps you actively participate in the process. You can also refer to educational resources from the American Dental Association for further information.
Taking these steps not only restores your smile but also improves your quality of life. Each stage of the dental implant process is essential. Following your dentist’s advice makes recovery smoother and more successful. By being informed, you transform uncertainty into confidence. You deserve a healthy, beautiful smile. Embrace this journey with assurance and care.


